
How to Use the Desktop Software
From installation & licensing to work queue, AI models, output settings, and presets.
A step-by-step manual even first-time users can follow.
1.1 System Requirements
1) Minimum / Recommended Hardware
| Minimum | Recommended | |
|---|---|---|
| OS | Windows 10 (64-bit) | Windows 11 (64-bit) |
| CPU | Intel i3 / Ryzen 3 | Intel i7 / Ryzen 7 |
| GPU | NVIDIA RTX 2060 (Turing or later) · TensorRT-capable GPU required | NVIDIA RTX 3090 (Ampere or later) · TensorRT-capable GPU required |
| RAM | 16 GB | 16 GB |
| Storage | 20 GB HDD | 20 GB SSD |
2) Supported GPUs
The AI PIXELL PRO desktop app uses TensorRT acceleration on the GPU, so an NVIDIA GPU meeting the conditions below is required.
Required
- NVIDIA GPU
- TensorRT acceleration support
- Windows 10 / 11 (64-bit)
Consumer / Creator (GeForce) · 28 models
| GPU Name | Architecture | VRAM / Memory | Category |
|---|---|---|---|
| GeForce RTX 5090 | Blackwell | 32GB GDDR7 | Consumer/Creator |
| GeForce RTX 5080 | Blackwell | 16GB GDDR7 | Consumer |
| GeForce RTX 5070 Ti | Blackwell | 16GB GDDR7 | Consumer |
| GeForce RTX 5070 | Blackwell | 12GB GDDR7 | Consumer |
| GeForce RTX 5060 Ti | Blackwell | 8GB / 16GB GDDR7 | Consumer |
| GeForce RTX 5060 | Blackwell | 8GB GDDR7 | Consumer |
| GeForce RTX 5050 | Blackwell | 8GB GDDR6 | Consumer |
| GeForce RTX 4090 | Ada Lovelace | 24GB GDDR6X | Consumer/Creator |
| GeForce RTX 4080 | Ada Lovelace | 16GB GDDR6X | Consumer |
| GeForce RTX 4070 Ti | Ada Lovelace | 12GB GDDR6X | Consumer |
| GeForce RTX 4070 | Ada Lovelace | 12GB GDDR6X | Consumer |
| GeForce RTX 4060 Ti | Ada Lovelace | 8GB / 16GB GDDR6 | Consumer |
| GeForce RTX 4060 | Ada Lovelace | 8GB GDDR6 | Consumer |
| GeForce RTX 4050 | Ada Lovelace | Typically 6GB, mostly laptop | Consumer/Mobile |
| GeForce RTX 3090 Ti | Ampere | 24GB GDDR6X | Consumer/Creator |
| GeForce RTX 3090 | Ampere | 24GB GDDR6X | Consumer/Creator |
| GeForce RTX 3080 Ti | Ampere | 12GB GDDR6X | Consumer |
| GeForce RTX 3080 | Ampere | 10GB / 12GB GDDR6X | Consumer |
| GeForce RTX 3070 Ti | Ampere | 8GB GDDR6X | Consumer |
| GeForce RTX 3070 | Ampere | 8GB GDDR6 | Consumer |
| GeForce RTX 3060 Ti | Ampere | 8GB GDDR6 | Consumer |
| GeForce RTX 3060 | Ampere | 8GB / 12GB GDDR6 | Consumer |
| GeForce RTX 3050 Ti | Ampere | Typically 4GB, mostly laptop | Consumer/Mobile |
| GeForce RTX 3050 | Ampere | 4GB / 6GB / 8GB variants | Consumer |
| GeForce RTX 2080 Ti | Turing | 11GB GDDR6 | Consumer |
| GeForce RTX 2080 | Turing | 8GB GDDR6 | Consumer |
| GeForce RTX 2070 | Turing | 8GB GDDR6 | Consumer |
| GeForce RTX 2060 | Turing | 6GB / 12GB GDDR6 | Consumer |
Workstation / Professional (NVIDIA RTX / Quadro) · 26 models
| GPU Name | Architecture | VRAM / Memory | Category |
|---|---|---|---|
| RTX PRO 6000 Blackwell Server Edition | Blackwell | 96GB GDDR7 ECC | Server/Professional |
| RTX PRO 4500 Blackwell Server Edition | Blackwell | 32GB GDDR7 ECC급 | Server/Professional |
| RTX PRO 6000 Blackwell Workstation Edition | Blackwell | 96GB GDDR7 ECC | Workstation |
| RTX PRO 6000 Blackwell Max-Q Workstation | Blackwell | 96GB GDDR7 ECC | Workstation |
| RTX PRO 5000 Blackwell | Blackwell | 48GB GDDR7 ECC급 | Workstation |
| RTX PRO 4500 Blackwell | Blackwell | 32GB GDDR7 ECC급 | Workstation |
| RTX PRO 4000 Blackwell | Blackwell | 24GB GDDR7 ECC급 | Workstation |
| RTX PRO 4000 Blackwell SFF | Blackwell | 24GB GDDR7 ECC급 | Compact Workstation |
| RTX PRO 2000 Blackwell | Blackwell | 16GB GDDR7급 | Workstation |
| RTX 6000 Ada | Ada Lovelace | 48GB GDDR6 ECC | Workstation |
| RTX 5000 Ada | Ada Lovelace | 32GB GDDR6 ECC | Workstation |
| RTX 4500 Ada | Ada Lovelace | 24GB GDDR6 ECC | Workstation |
| RTX 4000 Ada | Ada Lovelace | 20GB GDDR6 ECC | Workstation |
| RTX 4000 SFF Ada | Ada Lovelace | 20GB GDDR6 ECC | Compact Workstation |
| RTX 2000 Ada | Ada Lovelace | 16GB GDDR6 ECC | Workstation |
| RTX A6000 | Ampere | 48GB GDDR6 ECC | Workstation |
| RTX A5000 | Ampere | 24GB GDDR6 ECC | Workstation |
| RTX A4000 | Ampere | 16GB GDDR6 ECC | Workstation |
| RTX A3000 | Ampere | 6GB / 12GB 변형 | Mobile Workstation |
| RTX A2000 | Ampere | 6GB / 12GB | Workstation |
| Quadro RTX 8000 | Turing | 48GB GDDR6 ECC | Workstation |
| Quadro RTX 6000 | Turing | 24GB GDDR6 ECC | Workstation |
| Quadro RTX 5000 | Turing | 16GB GDDR6 | Workstation |
| Quadro RTX 4000 | Turing | 8GB GDDR6 | Workstation |
| Quadro RTX 3000 | Turing | 6GB GDDR6 | Mobile Workstation |
| NVIDIA TITAN RTX | Turing | 24GB GDDR6 | Prosumer/Workstation |
Server / Datacenter · 19 models
| GPU Name | Architecture | VRAM / Memory | Category |
|---|---|---|---|
| NVIDIA GB10 / DGX Spark | Blackwell | 128GB 통합 메모리 | Personal AI System |
| NVIDIA GB300 | Blackwell Ultra | 288GB HBM3e급 | Datacenter |
| NVIDIA B300 | Blackwell Ultra | 288GB HBM3e급 | Datacenter |
| NVIDIA GB300 / DGX Station | Blackwell Ultra | 252GB HBM3e급 | AI Workstation/Server |
| NVIDIA GB200 | Blackwell | 192GB HBM3e급 | Datacenter |
| NVIDIA B200 | Blackwell | 192GB HBM3e | Datacenter |
| NVIDIA GH200 | Hopper + Grace | 96GB 또는 141GB HBM 계열 | Datacenter |
| NVIDIA H200 | Hopper | 141GB HBM3e | Datacenter |
| NVIDIA H100 | Hopper | 80GB HBM2e/HBM3 | Datacenter |
| NVIDIA L40S | Ada Lovelace | 48GB GDDR6 ECC | Datacenter |
| NVIDIA L40 | Ada Lovelace | 48GB GDDR6 ECC | Datacenter |
| NVIDIA L4 | Ada Lovelace | 24GB GDDR6 | Datacenter |
| NVIDIA A100 | Ampere | 40GB / 80GB HBM2e | Datacenter |
| NVIDIA A30 | Ampere | 24GB HBM2 | Datacenter |
| NVIDIA A40 | Ampere | 48GB GDDR6 ECC | Datacenter |
| NVIDIA A10 | Ampere | 24GB GDDR6 | Datacenter |
| NVIDIA A16 | Ampere | 64GB GDDR6 (4×16GB) | Datacenter/VDI |
| NVIDIA A2 | Ampere | 16GB GDDR6 | Datacenter/Edge |
| NVIDIA T4 | Turing | 16GB GDDR6 | Datacenter/Inference |
3) Unsupported / Caveats
- NVIDIA GTX series (e.g. GTX 10/16xx): Classified as unsupported because TensorRT acceleration conditions may not be met or may be limited.
- AMD / Intel GPUs: Unsupported
- External GPUs (eGPU): Not recommended as issues can occur depending on connection type, bandwidth, and driver setup.
4) How to Check Your GPU (Windows)
- Task Manager → Performance tab → check the model name under GPU
- Or check Device Manager → Display adapters
5) Troubleshooting
- If errors keep occurring during launch or processing, first check the following.
- Update the NVIDIA driver (Studio Driver recommended)
- On laptops, set the app to run on the external GPU (High-performance NVIDIA processor)
- If GPU VRAM is insufficient (large videos / high-ratio upscale), lower the resolution / concurrent jobs and retry
1.2 Install & Run
1) Purchasing the Program
- Visit the aipixell.com page.
- Click the Buy button on the home page.

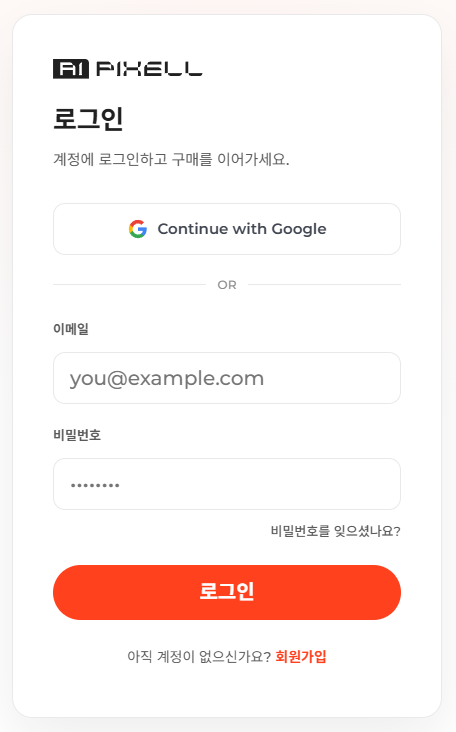
- On the login page, create an account via Sign up and log in.
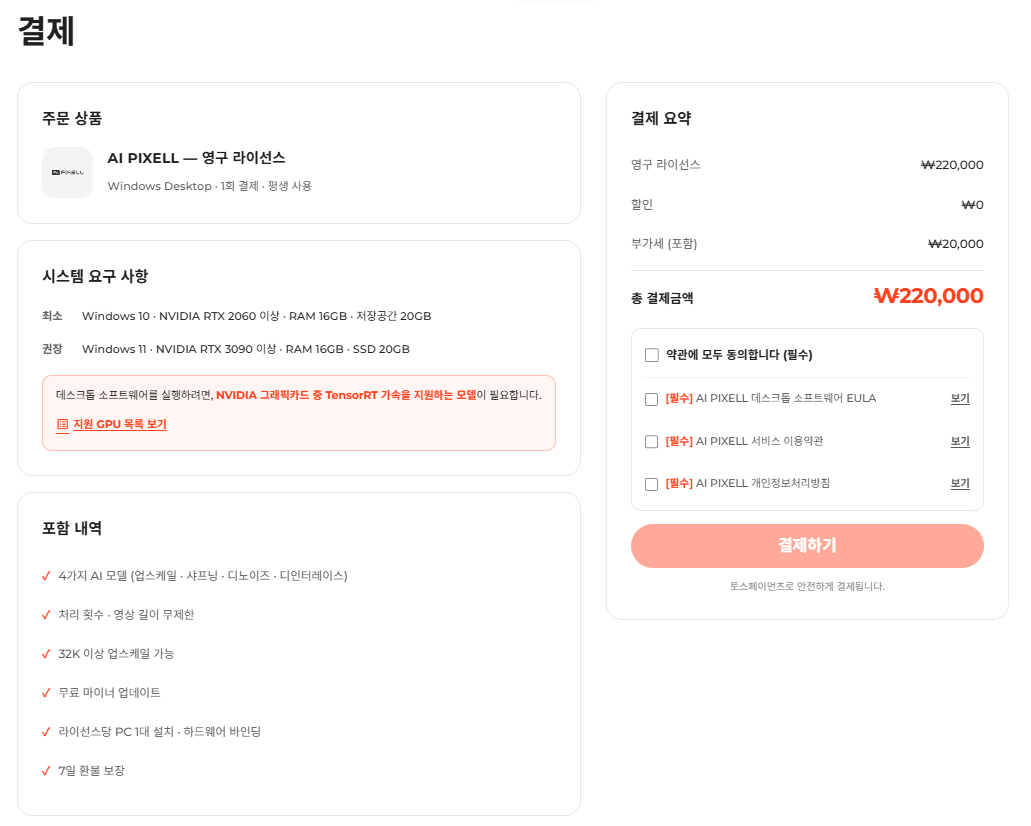
- Accept the payment terms and complete payment. (AI PIXELL PRO is a perpetual license.)
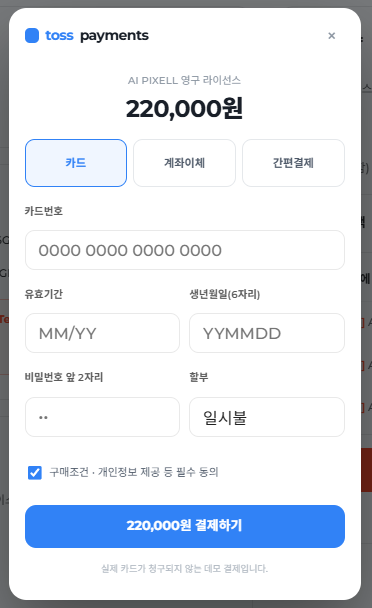
- Payment supports card, bank transfer, and easy pay.
2) Downloading the Program
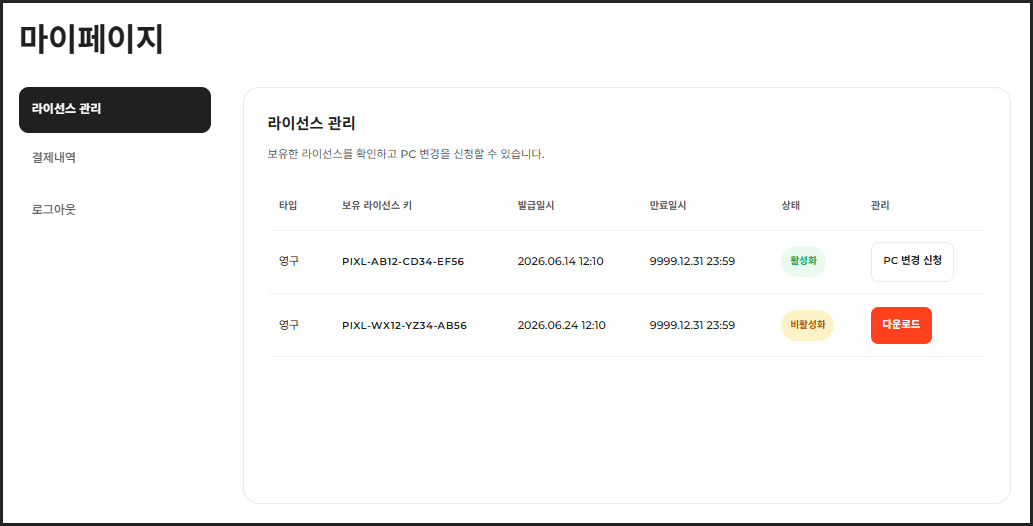
- On My Page, click the Download button for your purchased license.
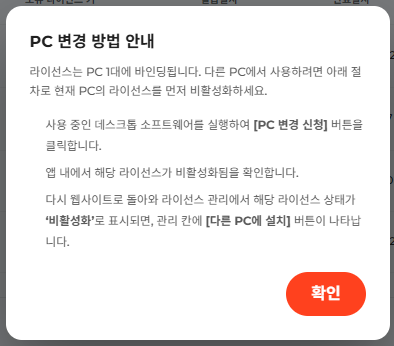
3) Changing the License PC
- On My Page, click the Change PC Request button to deactivate the license on the current PC.
- License transfer is allowed only once per year.
4) Installing AI PIXELL PRO
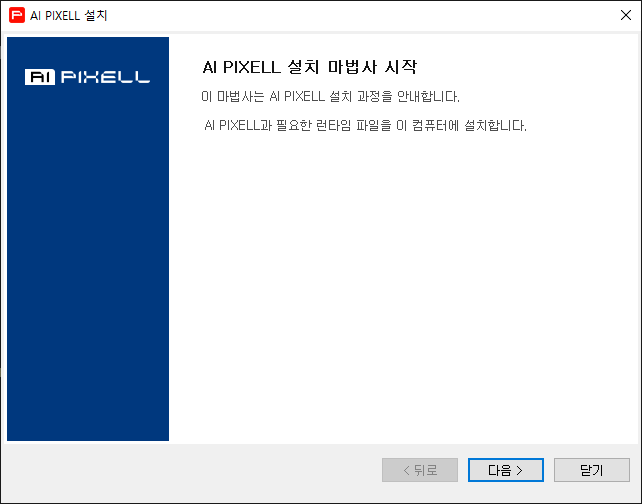
- Run the setup.exe file downloaded from the website.

- When the setup wizard starts, click [Next] to continue.
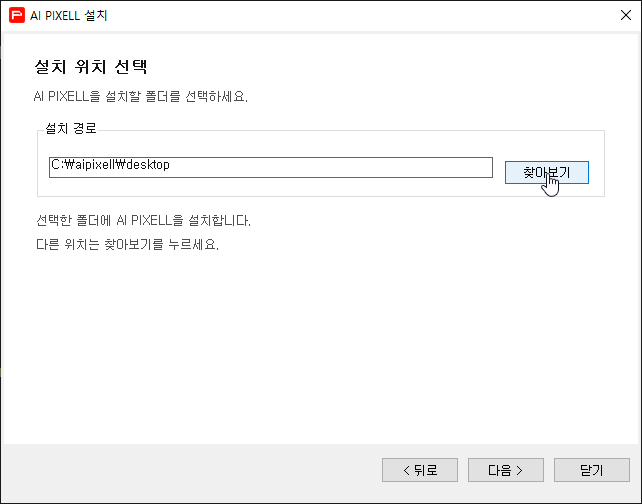
- Use the Browse button to set the install path. The default path is the Desktop.
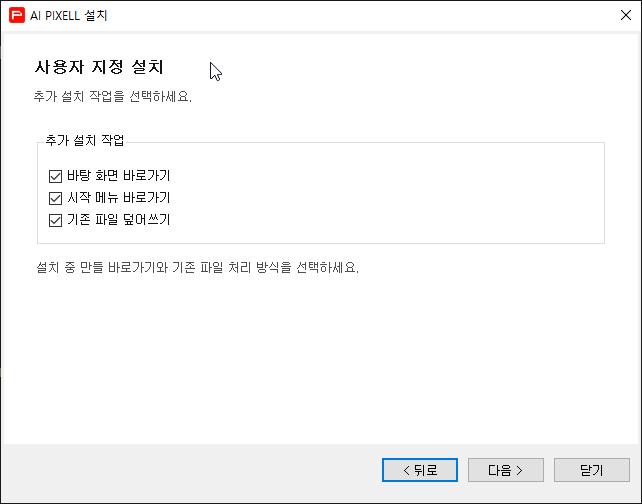
- Choose additional options like shortcuts, then click [Next].
- Installation will proceed. Please wait until it completes.
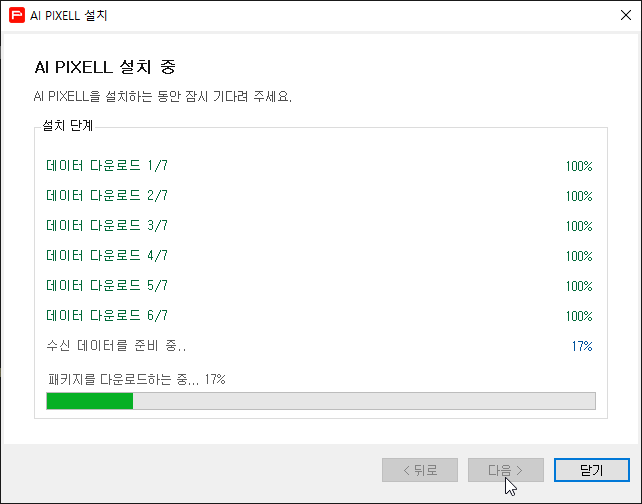
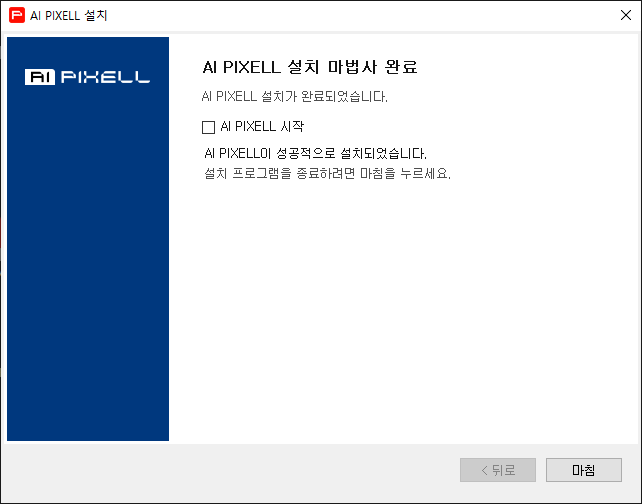
- After installation, launch AI PIXELL PRO.
2.1 Screen Layout
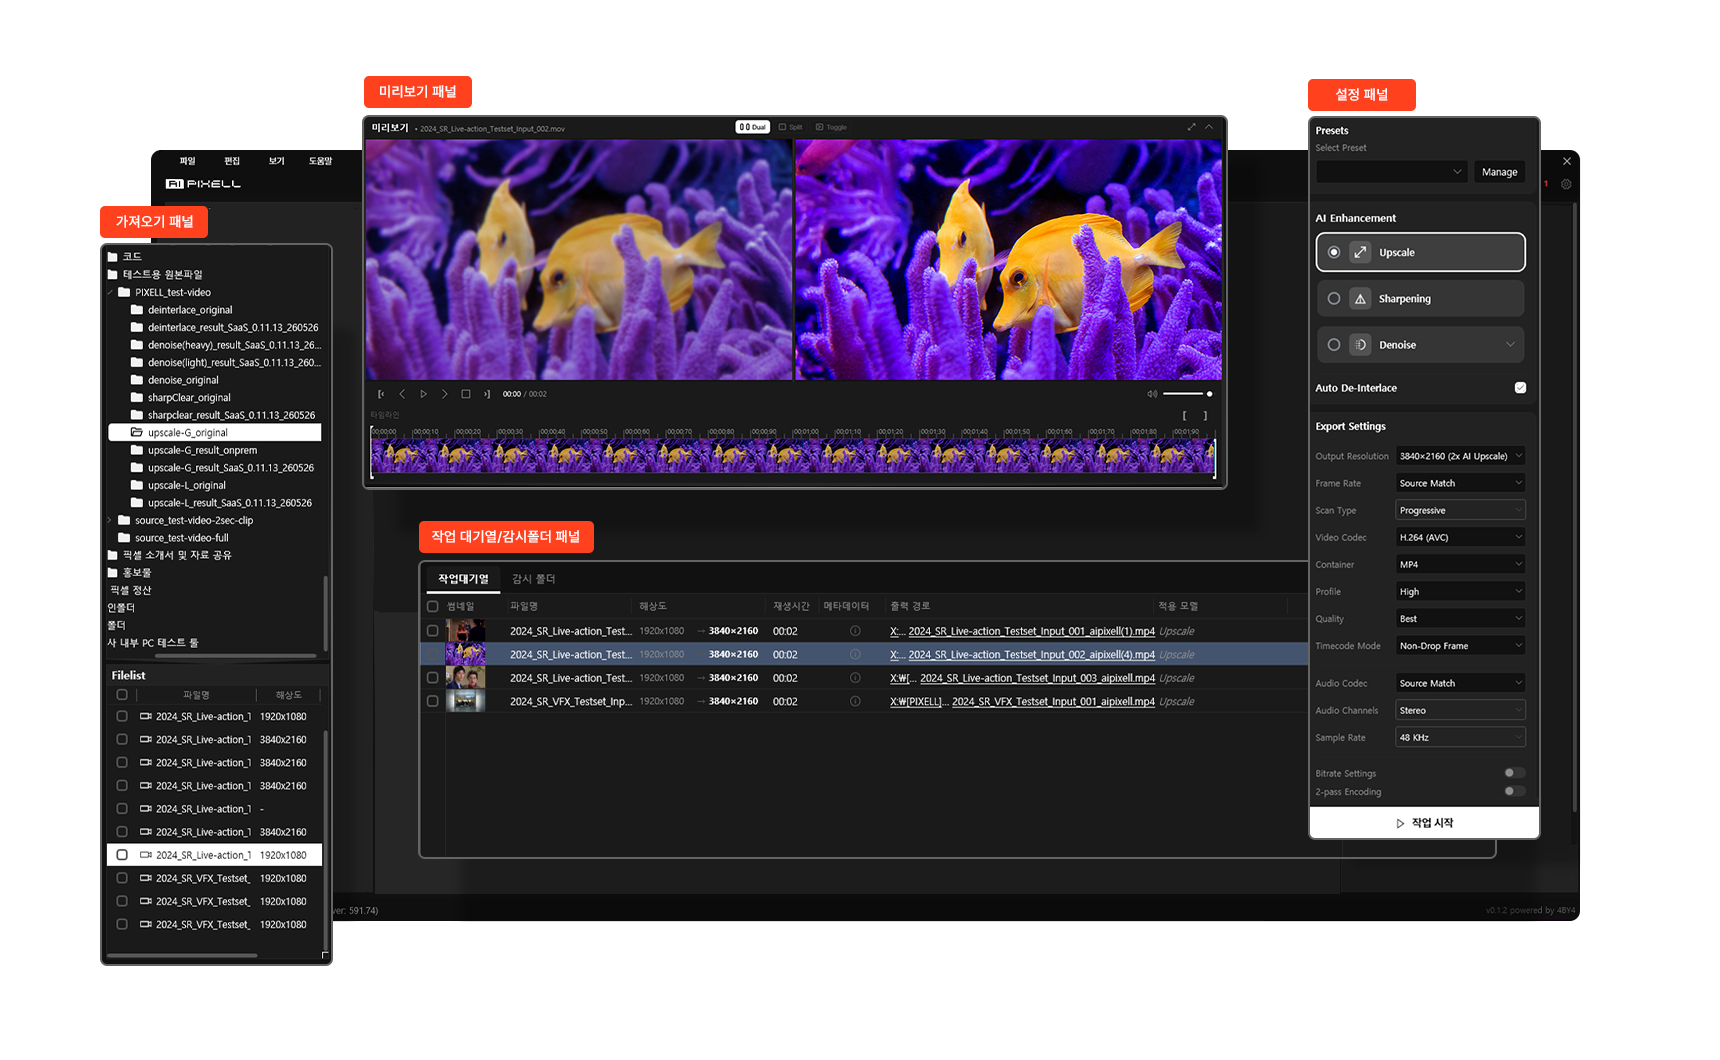
1) Import Panel
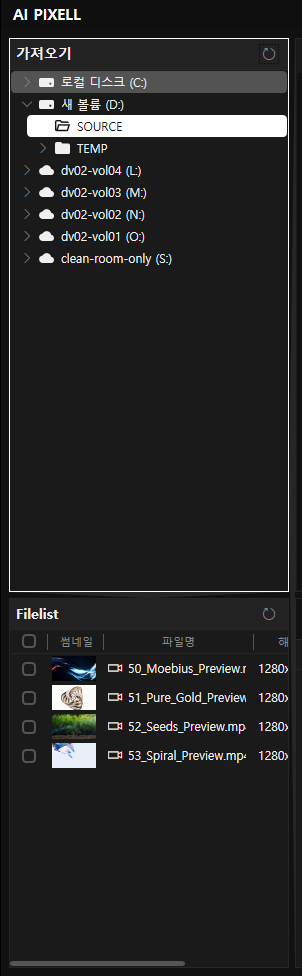
An area where you load and manage video / project files for processing. Added files appear in the work queue for downstream processing (model application / output settings).
Key Features
- Add Files: Select a folder from local storage to list video files.
- Multi-select / Bulk Import: Select multiple files at once and add them to the queue.
Information shown in the file list
- Duration: total length (min / sec)
- File name: name of the loaded file
- Resolution / Frame rate: basic specs of the input video
2) Work Queue / Watch Folder Panel
An area for managing files to process as a task list and operating the overall processing flow.
Core Concepts
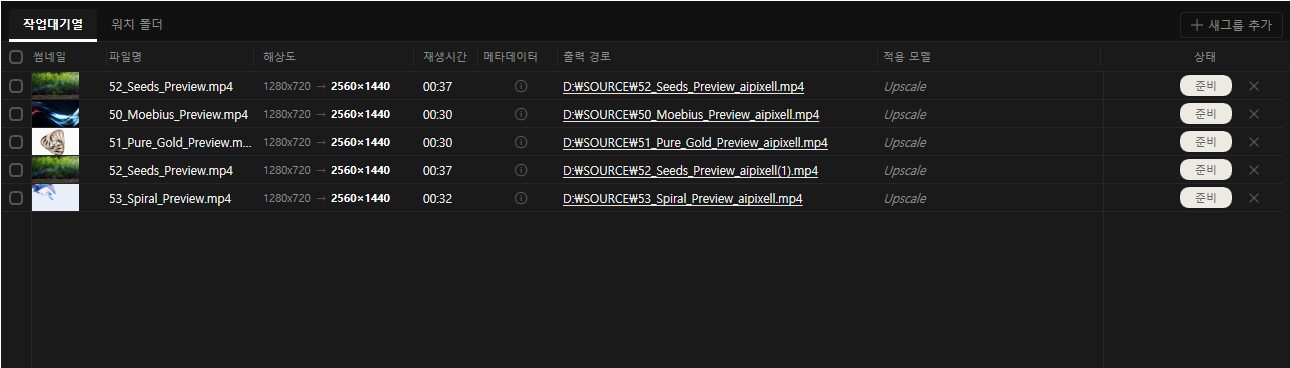
- Work Queue: A list where files / tasks to process accumulate. Each item has its own settings (model / options / output path) and is processed sequentially based on the run mode.
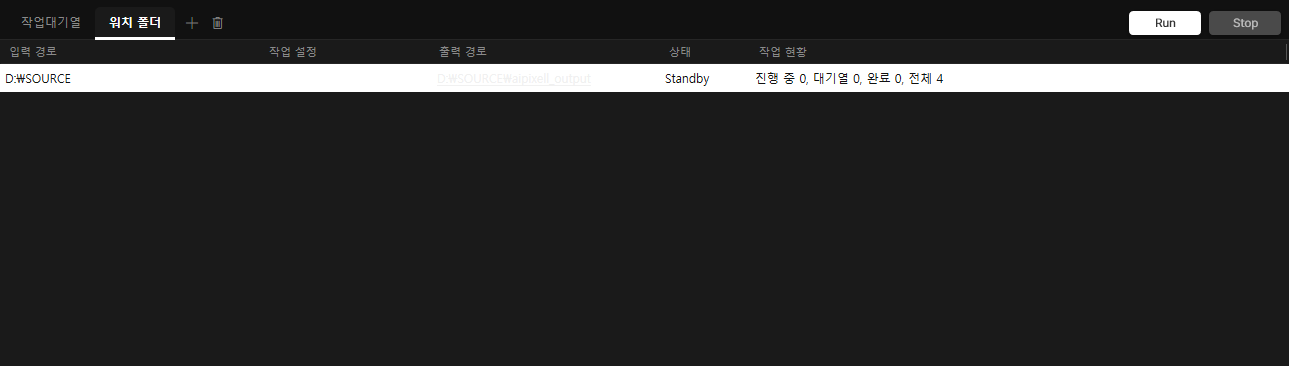
- Watch Folder: Monitors a specified folder so new / copied files are automatically registered in the work queue.
Key Features
- Add Task
- Add files selected in the Import panel to the queue
- Auto-add new files arriving in the watch folder
- Order / Priority Management
- Reorder queue items to prioritize important tasks
- Group selected files and process them as a group
- Output Path Settings
- Set the output folder where AI-processed results will be saved
- Run / Stop / Retry
- Run selected tasks
- Stop running tasks (where possible)
- Retry failed tasks (including after modifying settings)
- Per-task Settings View
- Check resolution, source/output metadata, save path, applied model, and status
Tips / Cautions
- AI PIXELL PRO currently supports only MP4, MOV, MKV, AVI, WebM, MXF. Check the file format before processing.
- Watching network or external drives may have detection delays. Local, stable paths are recommended when possible.
- If failures repeat, first check the input file for corruption, supported format, output path permission / disk space, then review logs / error messages.
3) Preview Panel
An area where you can compare the source clip with the AI-processed result and optionally export only a selected segment.
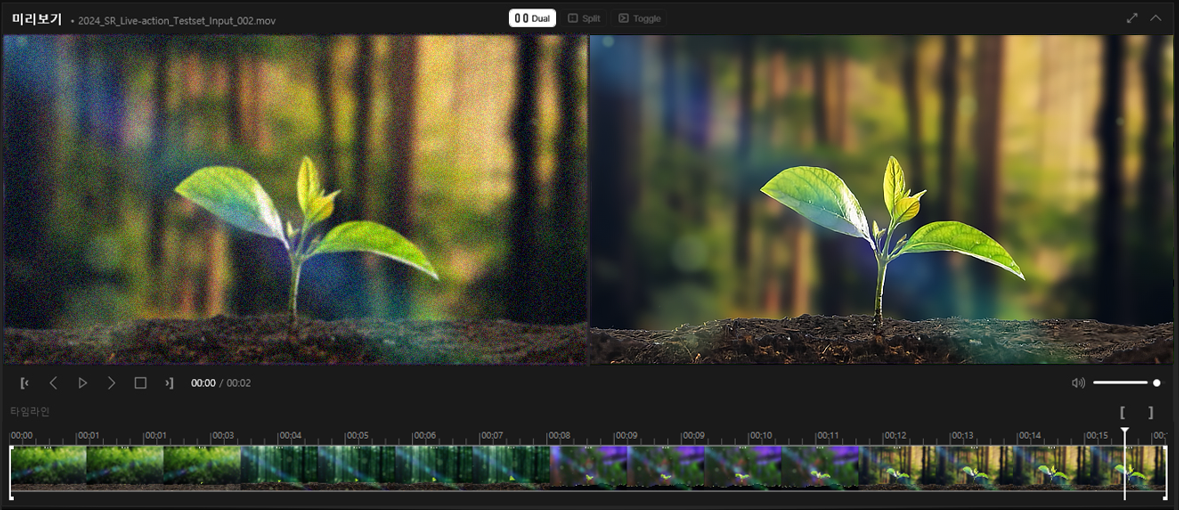
Layout
- Left (Source view): Shows the input source video / clip.
- Right (Output view): Shows the result with the selected AI model applied.
- Bottom (Timeline / Storyboard): Shows the clip as a timeline storyboard.
Key Features
- Source vs Output Comparison
- Compare before / after results quickly via left / right views.
- In/Out Range and Range Export
- Use the bottom timeline to set In/Out and export only the desired range.
- Playback Controls
- Play / pause and other basic controls to inspect range and results.
4) Output Settings Panel
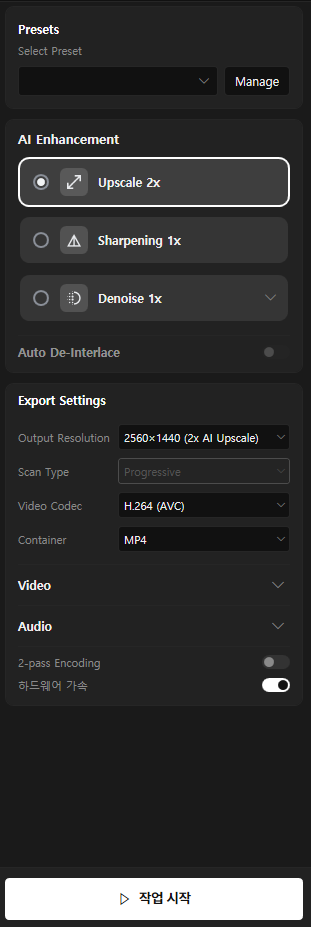
A menu to choose the AI model (Upscale / Sharpening / Denoise, etc.) for the selected task, configure output format, codec, save location, and then start the job (encode / render).
Key Features
- AI Model Selection: Choose a model that fits the purpose (resolution boost / sharpness / denoise).
- Auto De-Interlace: For interlaced files, the De-Interlace menu is enabled automatically.
- Output Format & Codec: Pick a container format (MP4 / MOV, etc.) and codec (H.264 / H.265 / ProRes, etc.).
- Output Quality / Bitrate: Use a preset or custom values for bitrate mode / value.
- Resolution / Frame Rate: Keep source or change.
- Start Job: Confirm settings and start the job. Progress is shown in the work queue.
- Save Preset: Save output settings as presets for reuse.
Tips / Cautions
- Codec / format combinations can drastically change file size and processing time — use the defaults that match your purpose first.
- Compare source and result in the preview panel by range (In/Out) first, then export the full clip.
- Jobs may fail if the output path has disk space / permission issues. Check the save location before running.
3.1 Add Files to the Work Queue
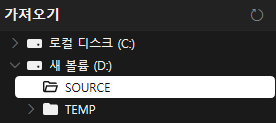
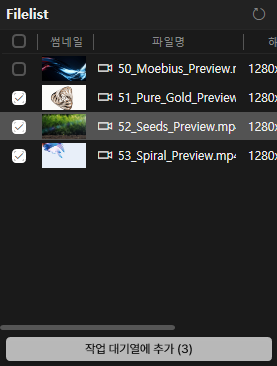
- Select a folder in the Import panel.
- Files inside the selected folder appear in the file list.
- Select files to process from the list. (Multi-select supported.)
- Use the checkbox at the top of the file list to select all files at once.
- Press Add to Queue to add to the queue.
- Confirm that items have been added to the queue.
3.2 Selecting a Task File
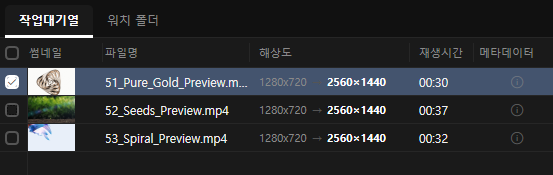
1) Single File Select
- In the work queue, click the left checkbox of the file you want to process.
2) Group Multiple Files
- Click the left checkbox of every file you want to group together.
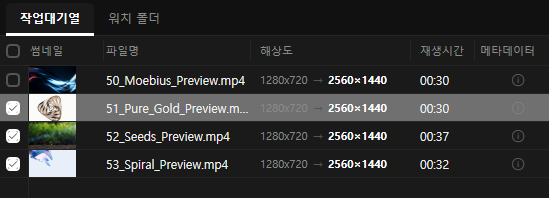
- Click the Group button at the top — `Group1` is created and the selected clips are added to it.

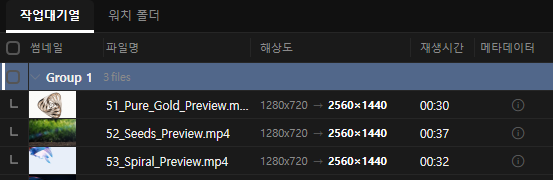
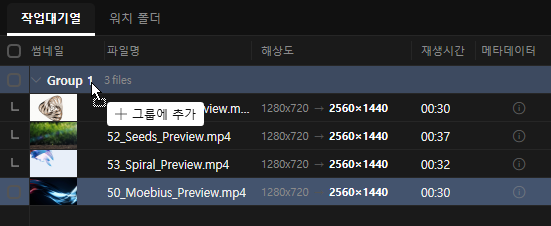
- Drag a file into an existing group to add it to that group.
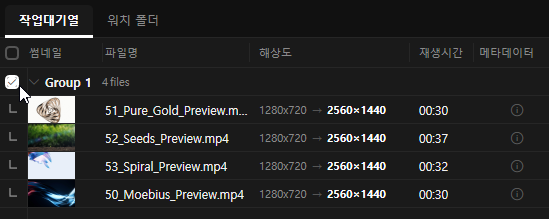
- To apply an AI model to a group, click the checkbox to the left of the group name to select it.
- Use the [Ungroup] button to dissolve a group.

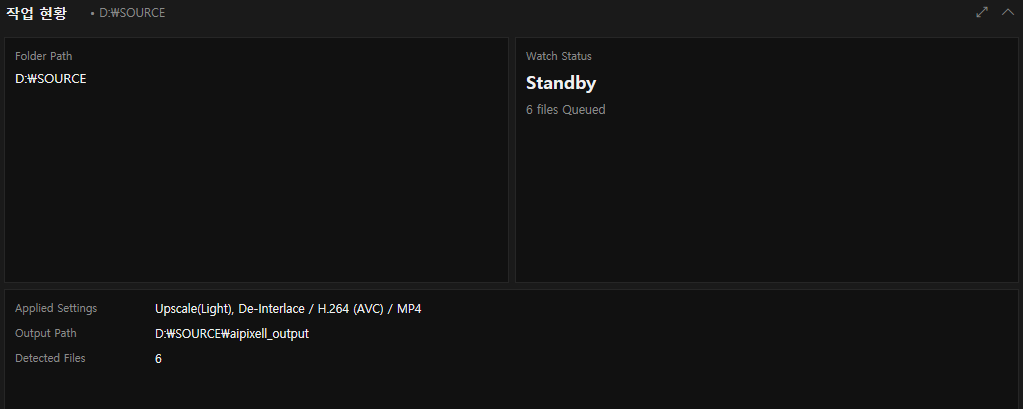
3) Watch Folder Setup
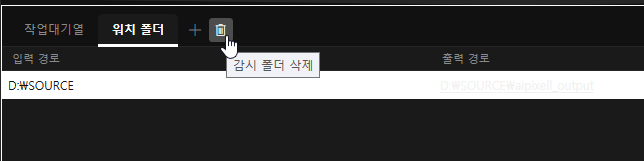
- Click the [+] button at the right of the Watch Folder tab to specify a watch folder.
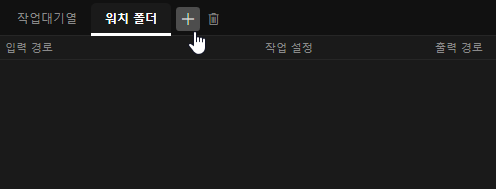
- Verify the information of the selected watch folder.
- Watch folders can be removed via the [Delete Watch Folder] button.
3.3 Selecting an AI Model
In the Output Settings panel, choose the AI model (Upscale / Sharpening / Denoise) that matches your purpose.
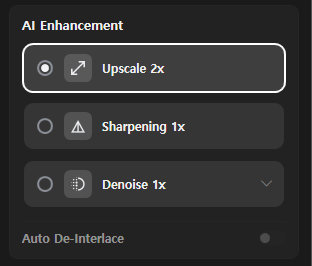

Upscale 2x
Uses AI to upscale the source resolution by 2x while improving detail and sharpness and reducing noise.
Sharpening 1x
Keeps the resolution while boosting sharpness for a crisper image.
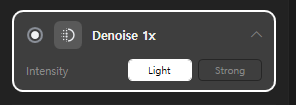
Denoise 1x
Keeps the resolution while removing unwanted noise. You can pick the noise strength (Light / Strong); for milder noise, applying Light first is recommended.
Auto De-Interlace
For interlaced sources, Auto De-Interlace is enabled automatically to remove interlacing.
3.4 Output Settings
1) Encoding Support Range
| Category | Supported Range |
|---|---|
| Video Codec | H.264 (AVC) · H.265 (HEVC) · VP9 · ProRes |
| Extension (Container) | MP4 · MOV · MKV |
| Profile · H.264 | High · Main |
| Profile · H.265 | Main · Main10 |
| Profile · VP9 | Good · Best |
| Profile · ProRes | 422 Proxy · 422 LT · 422 · 422 HQ · 4444 · 4444 XQ |
| Aspect Ratio | Square · DV NTSC · DV NTSC 16:9 · DV PAL · DV PAL 16:9 · Anamorphic 2:1 · HD Anamorphic · DVCPRO HD |
| Timecode | DF (Drop Frame) · NDF (Non-Drop Frame) |
| Bitrate Mode | Variable: Target / Max · Constant: Target |
2) File Output Settings
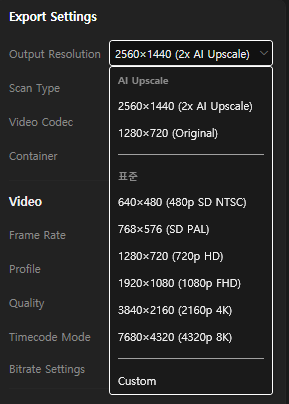
Resolution
- With Upscale model selected: output resolution is automatically upscaled by 2x.
- With other models (Sharpening / Denoise): defaults to the original resolution.
- Custom resolution: you can change the resolution, but without selecting the Upscale model the change does not apply AI upscaling — it is a simple resize.
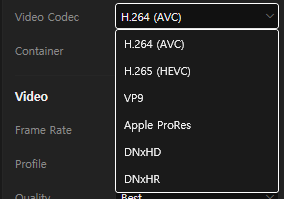
Video Codec
- Choose a codec from the codec list (supports H.264 · H.265 · VP9 · Apple ProRes · DNxHD · DNxHR).
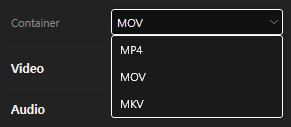
File Format
- Choose a file format (e.g. MP4 / MOV) that matches the selected codec.
3) Video Output Settings
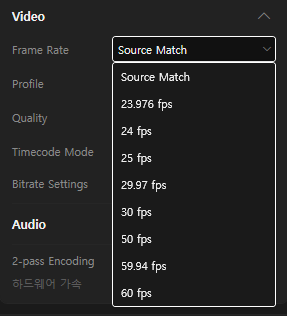
Frame Rate
- Defaults to the source frame rate.
- You can keep the original frame rate or change it to a desired fps for your purpose.
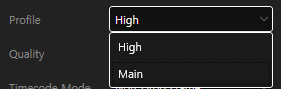
Profile
- High: a quality-focused profile with higher compression efficiency. Better for detail preservation at the same bitrate, but compatibility may be limited.
- Main: a compatibility-focused profile suited to a variety of playback environments. Recommended when stable playback is needed.
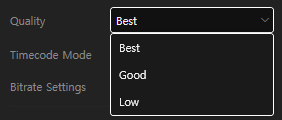
Quality
- Best — quality first
- Lower compression (= larger files) · longer encode time
- Preserves detail / grain; suited for post-production / archives
- Good — balanced (recommended default)
- Suited for general online uploads / internal sharing
- Low — size / speed first
- Higher compression (= smaller files) · faster encode
- Detail loss; block noise / banding may be more visible
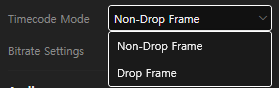
Timecode Mode
- NDF (Non-Drop Frame): timecode increases sequentially with frames. (Suited for frame-based editing / post-production.)
- DF (Drop Frame): at 29.97 / 59.94fps, skips some numbers so the displayed timecode matches real time. (Suited for broadcast / real-time runtime alignment.)
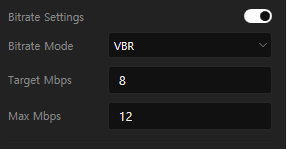
Bitrate
Bitrate is the amount of data per second of video (Mbps) — higher values improve quality but increase file size and encoding time.
- CBR (Constant Bitrate): keeps the bitrate near-constant throughout. (Best when bandwidth must be steady — streaming, broadcast.)
- VBR (Variable Bitrate): distributes the bitrate based on scene complexity. (Better quality-to-size efficiency at the same target.)
- Target Mbps: the average / baseline bitrate the encoder aims for. Higher = better quality and larger size.
- Max Mbps: the peak cap that the encoder must not exceed even on complex scenes. Mostly meaningful for VBR / ABR.
4) Audio Output Settings
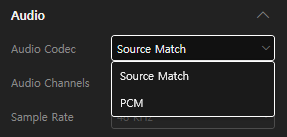
Audio Codec
- Defaults to the source audio codec.
- Output codec supports AAC / OPUS / PCM depending on the video codec. (Other codecs not supported.)
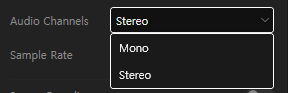
Audio Channels
- Defaults to Stereo; Mono is also available if needed.
- Channel options are enabled only when AAC / OPUS / PCM is selected.
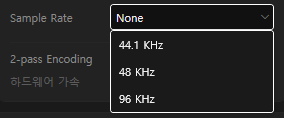
Sample Rate
- 44.1 KHz / 48 KHz / 96 KHz supported.
- Sample rate options apply identically regardless of the selected audio codec.
3.5 Creating & Managing Presets
A preset stores frequently used output settings (model / codec / resolution / bitrate, etc.) and lets you apply them all at once to future jobs.
1) Creating a Preset
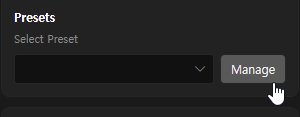
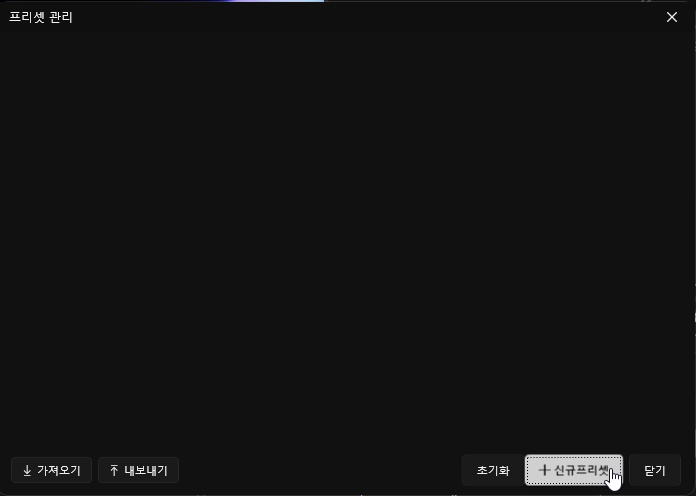
- Manage: Click the manage menu to open the preset management window.
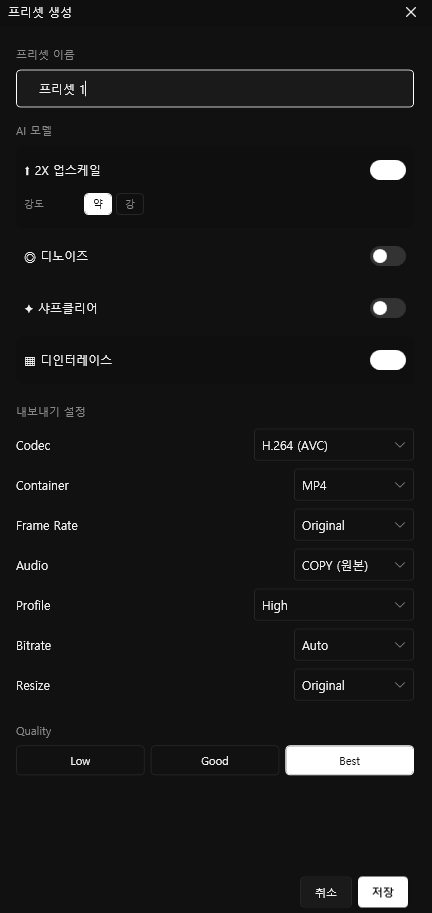
- Click the New Preset button to open the preset settings menu.
- Name the preset, finish the AI model / export settings, then click Save.
- Created presets can be edited · copied · deleted in the management window.
2) Applying a Preset
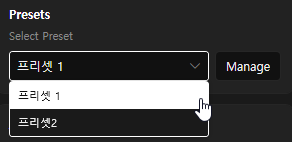
- Select Preset: Choose a saved preset to apply to the current job.
3.6 Running Jobs & Status
1) Output Path
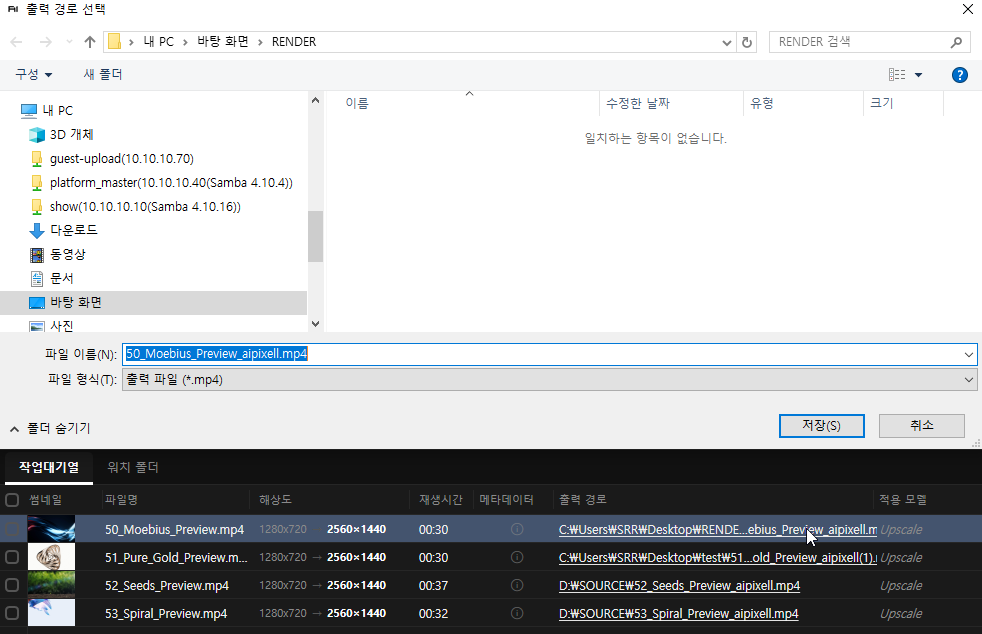
- In the work queue list, click the output path link and select a folder to save to.
2) Output Range
- By default, the entire video range is set.
- To set a range, move the left / right cursor-shaped bars to specify the range.
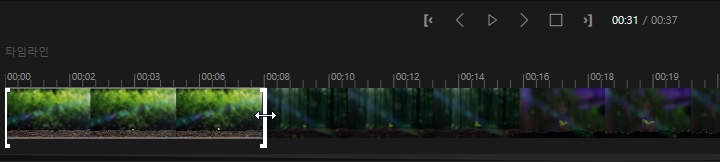
3) File Output
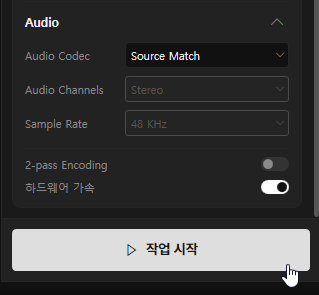

Start Job
- Press the [Start Job] button at the bottom of the settings panel to begin output (rendering).
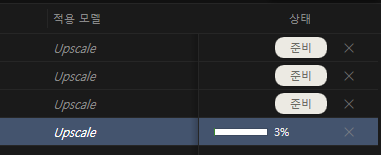
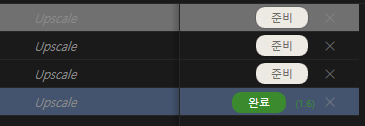
Status
- Once started, you can check progress (%) in the status pane.
- The estimated remaining time is shown in the center of the preview panel.
- When finished, the status message shows ‘Complete’.
- Settings panels are locked while a job is running.
4) Reviewing Results
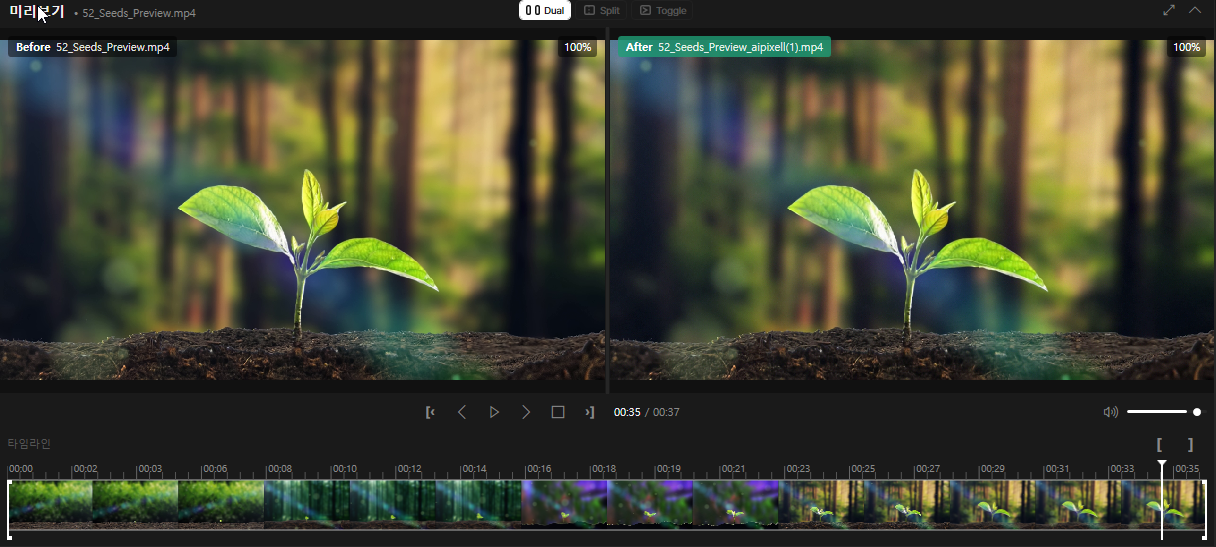
When output completes, the generated result is automatically loaded into the preview panel's right side (Output view). You can compare Left = Source / Right = Output simultaneously without reopening the file.
- Left (Source view): the input source clip
- Right (Output view): the just-finished result, loaded automatically
- Use Split (left / right split) or Toggle (source / output switch) to inspect before / after differences more easily.
3.7 Reviewing Output
- Completed jobs produce files in the specified output folder.
- If failures repeat, check in the following order.
- Input file corruption
- Supported formats
- Output path permissions / disk space
- Error messages / logs
4.1 Interface Settings

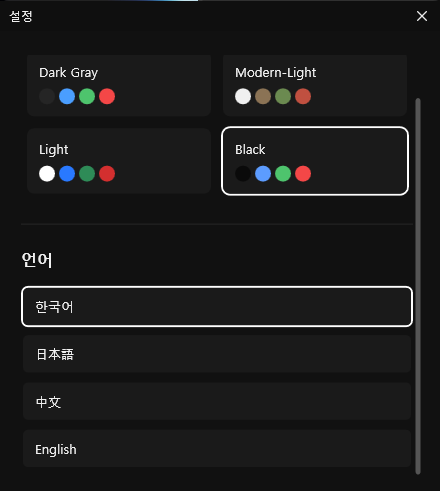
Change background color
- From the Settings menu, change the work interface's background color.
Change language
- From the Settings menu, change the work interface's display language.
5.1 Billing · Refund
The desktop software is a $159 perpetual license — pay once, use forever. There are no monthly subscriptions or credit top-ups.
| Item | Details |
|---|---|
| Payment Methods | Credit / debit card, bank transfer (tax invoice), purchase order (PO) |
| Receipts · Vouchers | Receipt sent via email after purchase; tax invoice available |
| Refund Policy | Full refund within 7 days of payment when unused (license not activated) |
To request a refund
- Prepare the email and order number (receipt) used for purchase.
- Submit your refund request and reason via Billing · Refund inquiry below.
- After review, refunds are issued via the original payment method within 3–5 business days.